Thursday, March 20, 2025

Large Envelope Folio

Good afternoon everybody! 

Boy…is it windy, cloudy and snowy here in Montana today. In other words, the perfect day to sit in my craft room and share a project with you. 

Today, I am going to share an envelope folio that I made this last weekend. Right now I am addicted to 49 and Market papers, ephemera and their other Scrapbooking/cardmaking/paper crafting pieces. Their sets are so versatile and coordinate beautifully. I have a wonderful friend who hosts craft retreats, and she turned me on to this company. You can find her site for retreats and products at https://www.facebook.com/share/16D4cbveb3/?mibextid=wwXIfr

Guys… I also love watching https://youtube.com/@lenaecreates?si=RwHjvm8MJoXNsNA. She does amazing things with envelopes. You definitely have to check her out as this is where I got the idea, for my folio, in this post.


You can see my detailed, finished folio and the products that I used, on my YouTube channel, https://www.youtube.com/@Dogsrockpapercrafts. You will have a chance to win my finished folio by following the directions I listed in the commentary section of my YouTube channel. 
I also have an Instagram @dogsrockpapercrafts where I put projects that may not be anywhere else in my profiles.


                          First unfold view. 


                     Full inside, unfolded view


                    Full backside, unfolded view


These three file tabs go into pockets in the folio. Again, you can see the full video on my YouTube channel.


This is a picture of just the three file tab panels. I did put a brief video below to show you how I did them.


     Vinnie having a snuggle, with my husband, on the couch. 

I hope this post provides some inspiration for your crafting journey! Let me know in the comments if you have any further questions.

Saturday, March 1, 2025

3D Gift Card Wallet

Hello everyone! It’s Wendy and today I’m sharing @scrapdiva.designs 3-D wallet die. This die is great because it makes a holder for gift cards or other little trinkets. 

I did see where she has the cutest little purse die, to go along with his wallet, so I had to have it! My next blog post will feature that purse and how adorable it is. You can put this wallet inside of it to make a relief fun gift.


As you can see you get quite a few dies for your money! The rectangle in the set can be used for any background and there are three word dies included. The words are gift card, tickets  and coupons. 


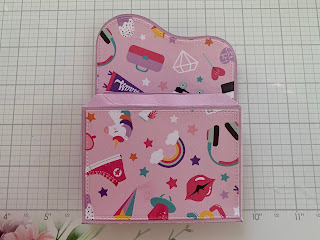
For my designer paper, I used a set from Echo Park called teen Spirit. I also used some Stampin Up pretty in pink card stock for the base. I wanted to make a little gift card wallet for my granddaughter and I wanted it to be a little funky, 80s style. How many of us remember going to the skating rink in the 80s and skating to Jessie’s girl!


These are all the pieces cut out above. I really like to ink the edges of my papers just to give them a little depth. The accordion paper pieces you’ll make using the die that looks like a ticket with three lines in it.


As you can see I folded all the score lines on the base and that gives me the inside of my wallet. I’ve seen a couple videos on putting together this set, but the way I chose to do it was to put the big rectangle piece as my inside designer paper. I used all the folds as my guide.

 I also glued on one of my designer paper flap panels that will go towards the outside.


Then I scored the base of the wallet with the designer rectangle inside. Then it folds really nicely into your Wallet base.


Then I took the smaller rectangle panels,of designer paper, and attached them to the outside panels of the base of the wallet. 

I also attached the second piece of designer paper on the other side of my flap piece. You’ll see below why you need both of the flap panels on each side.


Next, you attach your flap to one of the tabs going the long way at the top of the card base as seen above. This makes the closure flap of the wallet.


To attach the accordion pieces, to make your wallet 3-D, you’re going to glue the tabs to the tabs on the card base, as seen above, so that the V of the accordion is facing the outside.  


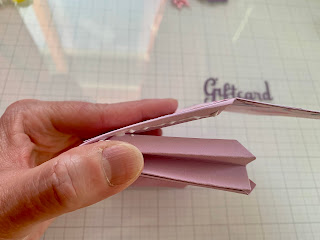
Once you’ve done all that you’ll notice one more flap left over on the base of your wallet. For this one, put glue on the inward-facing side of the flap and press it into the inside of the wallet. This gives the front of the wallet, at the flap, a little more omph.


You want that little bit of an omph at the top so it helps support the Wallet when you add your closure piece. I chose to use these Velcro dots I got from Amazon.  I’ve also seen people use small, magnetic closures. I wanted to use the Velcro dots on the Wallet, and then I will use magnetic dots, as closures, for my bigger purse.


I attached a fun video, of my completed projects, above. I can’t wait to give these out as gifts! What tween doesn’t love a funky gift card holder? Maybe a gift card to a clothes store, a make up store or whatever that special tween in your life loves. 


My two hooligans, Daisy and Vinny, at the scene of the crime!

I hope you liked this post, and if you did, I would be very grateful if you would like my blog and subscribe. Thank you for hanging out with me today and I hope you have a great rest of the weekend!

I can also be found on my Instagram page @dogsrockpapercrafts and my YouTube channel https://youtube.com/@dogsrockpapercrafts?si=OjWrrwU_xh41eWwk

Large Envelope Folio

Good afternoon everybody!  Boy…is it windy, cloudy and snowy here in Montana today. In other words, the perfect day to sit in my craft room ...